2022-07-21
High Performance Raspberry Pi Cluster, part 1
I have wanted to build my own computer cluster for a long time and now I finally able to take the first step.
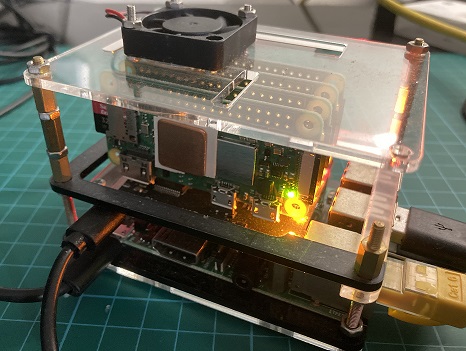
I choose to use a Raspberry Pi 3 Model B with ClusterHat and 4 Raspberry Pi Zero 2 W. You will also need 5 microSD card, and decent USB power adapter for your Raspberry Pi. Extra USB drive and a case is recommended. The USB drive will help with setting up shared drive for all the nodes. You can get prebuilt case for ClusterHat or make a 'custom' one like me (as in the picture). A short USB A to microUSB to provide extra power the ClusterHat. (I use this extra USB power cable in my setup, I am not sure if it have any impact on my setup. The picture from ClusterHat website seems to use this as well.)
There are already many guides out there how to set up computer cluster on Raspberry Pi, including Garret Mills' Building a Raspberry Pi and Davin L's The Missing ClusterHat Tutorial. Many of the steps in this post is taken from those excellent tutorials, with some modification/correction/updates for my setup.
You don't need to use the same hardware as I mentioned above to make computer cluster. It is possible to use Intel/AMD PC or even regular Raspberry Pi 3/4. However using Raspberry Pi Zero 2 W is interesting because of the low power usage and the small size. The problem with Raspberry Pi Zero /Pi Zero 2 is the connectivity; there are no ethernet connectivity and we generally need to use USB to Ethernet adapter. I don't think using wifi for computer cluster is a good idea.
Using ClusterHat is interesting idea because:
- We don't need extra adapter for Raspberry Pi Zero 2 to Ethernet.
- We don't need ethernet switch to connect between the controller (in my case, the controller is the Raspbery Pi 3 Model B) The ClusterHat have 4 port USB hub and use USB Gadget Mode to connect to Raspberry Pi for ethernet and serial console)
- Compact size
- ClusterHat provide prebuilt OS image for the Raspberry Pi and Pi zeros.
- One of the Controller OS image support CNAT mode which is interesting as it simplify many of the configuration.
ClusterHat is not absolutely needed for building computer cluster, but I found that it simplify building of the cluster in a compact size. The Clusterhat was originally created to use Raspberry Pi Zero 1 (W/WH), but the performance will be much slower. With the relase of Raspberry Pi Zero 2, the performance now improved by leaps and bounds. We do need to take care of the power consumption of the overall package in our configuration though, otherwise you will into some problem. This post in ClusterHat support explain clearly about the power issue. In my setup, I already take this into consideration, and I do not find any power issue in my setup. Note that my setup will try to setup the controller and nodes to use minimum power as possible.
In my setup, the Raspberry Pi 3 model B and Raspberry Pi Zero 2 are based on the same type of CPU. There could be some advantage of using this setup, I may use this advantage in my other project idea using this cluster.
If you go to ClusterHat's software setup page after you read this post, the image they have should already supported Raspberry Pi Zero 2 W. You can choose either the 32bit image or 64 bit image, but I think it is important to use the same 32/64bit image for the controller and all the nodes (p1-P4) I downloaded the CNAT-Lite Controller and P1-P4 Bullseye image in my setup. Although ClusterHat support USB boot to load image to the nodes, Raspberry Pi Zero 2 has some issue with USB boot of the OS image. My setup just use microSD card for all the Pi Zeros 2. However I did not disable the RPIBOOT from the controller to avoid changing the IP address of the node.
I STRONGLY recommend using Raspberry Pi Imager to write the OS image, especially for the P1-P4 nodes. The recent Raspberry Pi OS (which the prebuilt image from ClusterHat is based on) requires you to setup the OS at the first boot by default. This means you need to connect the Raspberry Pis to display and keyboard for this first setup. But since the prebuilt image for P1-P4 nodes already preconfigured the USB as device, the USB cannot be used to connect to keyboard anymore and this setup will not work. For those using Pi Zeros for PiKVM you may encounter this problem as well. Using Raspberry Pi Imager, you have the option to configure the OS image before you write it in Advance Menu.
I recommend using Advance Menu in Raspberry Pi Imager to set the following:
- Set hostname: in this example I set controller hostname
cnatand nodes withp1,p2,p3, andp4. Take note on the hostname you set as it is required later. - Enable SSH: Use password authentication is fine for now.
- Set username and password: we need to use the same username and password for all controller and nodes in this setup. More on this later.
- Set the same regional setting for all controller and nodes.
NOTE, to avoid confusion in the following steps:
- You may want to label the micro SD card properly.
- Configure P1 image with
p1hostname, etc. - Insert the
p1microSD card to the Raspberry Pi Zero 2 in port P1 and so on. Obviously microSD with controller image should go to the controller Raspberry Pi.
After you flash all the microSD card and insert to the device, it is time to power on the controller. At this point, you should not power on any of the nodes yet to avoid undervoltage issue.
I recommend configure the controller first without turning on the Nodes. After the nodes is configured, power on and configure the node one at a time. This will make sure the low-power setting is applied to all nodes and controller before we fully power them together.
At the time of writing, the prebuilt image will use the following IP for the nodes (if you use CNAT for controller):
- P1: 172.19.181.1
- P2: 172.19.181.2
- P3: 172.19.181.3
- P4: 172.19.181.4
We will configure SSH config to easily ssh to node from controller by updating ~/.ssh/config in controller
and copy the following to the file, replacing \[usr\] with the username:
Host p1
    Hostname 172.19.181.1
    User [usr]
Host p2
    Hostname 172.19.181.2
    User [usr]
Host p3
    Hostname 172.19.181.3
    User [usr]
Host p4
    Hostname 172.19.181.4
    User [usr]
To power on one node at a time, type (where X is the node/port on ClusterHat):
$clusterctrl on PXThe first setup is to update the /boot/config.txt. I update the following at the bottom of this file:
[all]
\# disable wifi and bluetooth
dtoverlay=disable-wifi
dtoverlay=disable-bt

\#clockdown to minimum clock
arm_freq=600
arm_freq_max=600

\#undervolt the CPU
over_voltage=-4
over_voltage_min=-4

\# set GPU mem to minimum (16MB)
gpu_mem=16
Notice that in my setup, I disable Wifi and bluetooth, set the Raspberry Pi clock to minimum, undervolt the voltage to lower the power consumption. There is option to disable the LED to save a little bit more power, but I think it is better to have light indicator to have a quick glance to check your cluster. I also set gpu memory to minimum since we are running as server/headless most of the time. In my case, my Raspberry Pi Zero 2 W refuse to boot if the over_voltage settings is set to -8.
If you want to connect fan to Clusterhat, you can add the following (for controller only):
\#enable Cluster Hat fan (for controller only)
dtoverlay=gpio-fan,gpiopin=18,temp=65000
and the fan can be enabled using the following command:
$clusterctrl fan onI recommend to connect to your controller using SSH and disable HDMI for the controller and nodes to save even more power.
To do this we first need to set the Legacy HDMI driver using the sudo raspi-config command, and select Advance Option->GL Driver->G1 Legacy.
Press Y if you are ask for confirmation. Once it is done, exit the raspi-config and edit /etc/rc.local and add the following line just above exit 0:
\# disable HDMI (note: make sure to use Legacy GL driver.)
/usr/bin/tvservice -o
In my quick test, disabling HDMI result in significantly lower temperature of the chip. Using the setting here, my Raspberry Pi temperature is about 38C when idle and 58C when stress tested (even without any fan). Note that I paste a small metal plate to dissipate the heat.
To power on all the node (make sure you configure each nodes and controller individually below before you do this):
$clusterctrl onI use the following command to stress test the devices (you need to install sysbench first if you haven't, use sudo apt install sysbench):
$sysbench --num-threads=4 --test=cpu --cpu-max-prime=100000 --validate run > result.log &I don't find any low voltage issue with this setup, even with all nodes running the sysbench at the same time. We can use the following command to check the temperature:
$vcgencmd measure_tempTo power off all the nodes, make sure you have shutdown each of the nodes X properly:
$ssh pX
pX$ sudo shutdown now
before doing this (make sure the shutdown is complete):
$clusterctrl offI think this is quite long for a single post. I will continue in the upcoming post for more about this cluster.
Additional Info
Under Construction.